


Dependency Injection in Spring Boot
This chapter covers how Dependency Injection works in Spring Boot including @Autowired, field injection, constructor injection and setter method injection.
March 22, 2024 · 19 min read · Updated Sep 2025
In the previous chapter, we saw that @SpringBootApplication bundles @ComponentScan to automatically detect and register your Spring beans. In this chapter, we'll unpack what that actually means — how Spring registers beans, and the different ways it injects them into the classes that need them.
Before diving into the definition of DI, let us see how we manage dependencies traditionally in Java without using Spring Dependency Injection.
public class UserService {
    final Logger logger = LoggerFactory.getLogger(UserService.class);

    private final EmailService emailService;
    private final UserRepository userRepository;

    public UserService() {
        this.emailService = new EmailService();
        this.userRepository = new UserRepository();
    }

    public void registerUser(User user) {
        userRepository.saveUser(user);

        emailService.emailUser("User registered successfully!",
                user.getEmail());
    }
}In the above code snippet, the UserService class has the registerUser() method, which is used to create a user and then send an email notification.
Hence the UserService class defines the EmailService and UserRepository member variables, and they are instantiated within the default constructor of the UserService class.
The challenge with the above code is:
- It creates a hard-coded dependency of
UserRepositoryandEmailServicewithin yourUserServiceclass. - The creation and usage of dependencies are tightly intertwined. If there are any changes to the
UserRepositoryorEmailService, we need to modify theUserServiceimplementation. - This can make our code difficult to test as we cannot easily mock the
UserRepositoryandEmailServiceinstances.
The testing challenges can be addressed by refactoring the UserService to have a constructor that passes two arguments.
public class UserService {
    final Logger logger = LoggerFactory.getLogger(UserService.class);

    private final EmailService emailService;
    private final UserRepository userRepository;

    public UserService(EmailService emailService, UserRepository userRepository) {
        this.emailService = emailService;
        this.userRepository = userRepository;
    }

    public void registerUser(User user) {
        userRepository.saveUser(user);

        emailService.emailUser("User registered successfully!",
                user.getEmail());
    }
}Now we can inject the mocks and do our testing, but this does not solve the real problem, as it is just moving the issue from one place to another.
As the number of dependencies and classes grows, manually managing dependencies can lead to a lot of repetitive code, which can be error-prone and increase the maintenance burden.
In essence, while it is technically possible to write your application without a Dependency Injection (DI) container, it becomes cumbersome, less maintainable, and error-prone as your application becomes more complex.
This is where the Dependency Injection comes to the rescue.
What is DI?
DI is a software design pattern used in object-oriented programming, where the dependencies of a class are provided by an external entity rather than being created within the class itself.
In other words, instead of a class creating and managing its dependencies, those dependencies are created and managed outside but, are "injected" into your class whenever you need it.
The main idea behind Dependency Injection is to decouple the bean instantiation process from your actual business logic implementation.
Dependency Injection (DI) in Spring
Dependency Injection (DI) is one of the core concepts of the Spring Framework. It is achieved through the Spring Framework's Inversion of Control (IoC) container. This allows the loose coupling of components and object creation and disposal responsibility is handed over to the spring container.
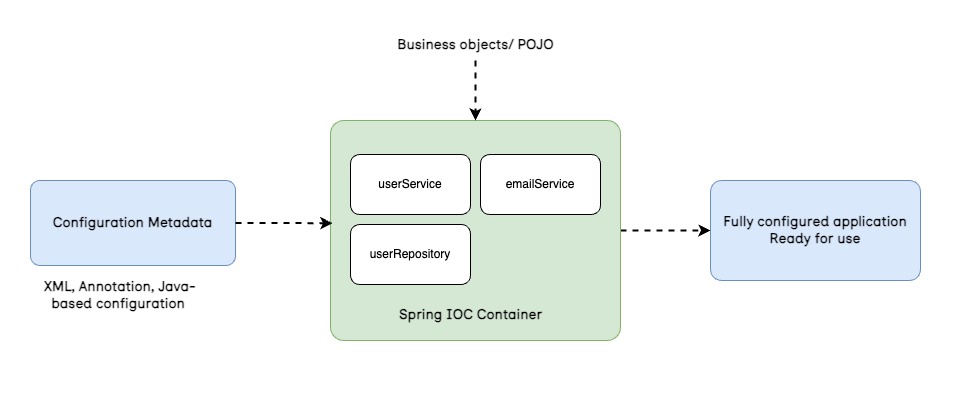
Any object in the Spring framework that is initialized through the Spring container is called Spring Bean.
Dependency Injection works in a two-step approach:
- Bean identification/registration — telling Spring which classes instances should be instantiated and managed by spring
- Bean injection — telling Spring where those beans should be plugged in
The two steps use different annotations and are easy to conflate as a beginner: registration annotations like @Service or @Component tell Spring "this class should become a bean", while @Autowired tells Spring "inject an already-registered bean here." You'll always need both of these steps.
Bean Identification/ Bean Registration
Bean identification refers to the way beans are identified within the Spring IoC container. Each bean is given a unique identifier that can be used to reference it later within the spring application context.
In Spring, this can be done using a XML configuration, Java Configuration or annotation-based configuration:
XML Schema Based Configuration:
Spring Beans can be explicitly defined in an XML configuration file. The Spring IOC reads the XML file and registers all the beans defined.
<?xml version="1.0" encoding="UTF-8"?>
<beans xmlns="http://www.springframework.org/schema/beans"
    xmlns:xsi="http://www.w3.org/2001/XMLSchema-instance"
    xsi:schemaLocation="http://www.springframework.org/schema/beans
    http://www.springframework.org/schema/beans/spring-beans.xsd">

    <bean id="userService" class="com.stacktips.app.service.UserService">
        <!-- Configure properties and dependencies needed -->
    </bean>
</beans>The downside of using XML configurations is they are not type-safe, meaning errors can be introduced that won't be caught until runtime.
Java Configuration:
Using Java-based configuration, beans are defined in a configuration class using the @Bean annotation. The configuration class marked with @Configuration annotation. It indicates that the class contains one or more bean definitions containing @Bean annotations.
For example:
@Configuration
public class AppConfig {

    @Bean
    public EmailService emailService() {
        return new EmailService();
    }

    @Bean
    public UserService userService(EmailService emailService) {
        return new UserService(emailService);
    }
}Annotation-based configuration:
Spring also provides a component scanning feature, using which spring automatically detect and registers the spring managed beans.
The @ComponentScan annotation, searches for all classes that are marked with stereotypes such as @Service, @Component, @Repository, or @Configuration annotation, and does the bean registration automatically.
For example, if you have a package com.stacktips.app that contains Spring-managed components, you can use @ComponentScan to register all of them with the Spring container.
@Configuration
@ComponentScan("com.stacktips.app")
public class AppConfig {

}Bean Identification in Spring Boot:
In Spring Boot, bean registration is typically done automatically using the @ComponentScan annotation rather than an explicit XML or Java configuration. As we saw in the previous chapter, @ComponentScan is already wrapped inside @SpringBootApplication.
Since every Spring Boot application's main class is already annotated with @SpringBootApplication, we don't have to add @ComponentScan explicitly. It performs component scanning starting from the package of your main class.
Hence, in case of Spring Boot, all we need to do is to use appropriate stereotypes for our classes.
@Service
public class UserService {
    // Your UserService implementation here
}Bean Injection
Bean Injection is the process by which, one object (the dependency) is passed to another object that needs it (the dependent), rather than the dependent object needing to create the dependency itself.
There are 3 main types of bean injection in Spring Boot
- Field Injection
- Constructor Injection
- Setter Method injection
Field Injection
In Field Injection, the dependencies are injected directly into the component's fields using the @Autowired annotation.
@Service
public class MyService {

    @Autowired
    private MyRepository myRepository;

    // Your UserService implementation here
}This approach is convenient but, due to direct field access it poses testing challenges;
Constructor Injection
Using constructor injection, the dependencies are injected through a component's constructor. The @Autowired annotation can be used on the constructor to indicate that a dependency should be injected into the constructor.
@Service
public class MyService {
    private final MyRepository myRepository;

    @Autowired
    public MyService(MyRepository myRepository) {
        this.myRepository = myRepository;
    }
}Starting with Spring 4.3, if a class, which is configured as a Spring bean, has only one constructor, the @Autowired annotation can be omitted and Spring will automatically inject all required dependencies.
If you have multiple overloaded constructors, we need to specify one of the constructors using @Autowired annotation.
Setter Method Injection
The Setter Injection allows for the modification of an object's dependencies after it has been constructed. This can be useful when an object's dependencies need to change dynamically at runtime.
It's more suitable for optional dependencies that can have default values or can be set to null.
@Service
public class MyService {
    private MyRepository myRepository;

    @Autowired
    public void setMyRepository(MyRepository myRepository) {
        this.myRepository = myRepository;
    }
}Note that the field can no longer be declared final here — unlike constructor injection, the field is set after the object is constructed, so Java won't allow final on it. This is also exactly why setter injection carries a risk that field injection and constructor injection don't: the object can be used before all of its dependencies are set, which can lead to NullPointerExceptions.
Which Injection Type Should You Use?
Of the three, constructor injection is the recommended for required dependencies.
- It lets you declare dependencies as
final, so they can't accidentally be reassigned or left unset after construction. - A bean is either fully constructed with everything it needs, or it fails to start — you find out immediately at startup instead of getting the
NullPointerExceptionat runtime. - It's the easiest to unit test without a Spring container at all, since you can just call
new MyService(mockRepository)
Field injection seems convenient, but it hides a class's dependencies from anyone reading its public API and makes it harder to test without using Java reflection. Use setter injection only when a dependency is optional.
If you end up with two beans that implement the same interface, Spring won't know which one to inject and will throw an error. In such cases, you will require to use
@Qualifierand@Primaryannotations to resolve that.
Summary
In this chapter, we saw why manually wiring up dependencies gets error-prone as an application grows, and how Spring's Dependency Injection solves it through its IoC container. We covered how beans get registered and different ways to inject beans.
In the next chapter, we'll look at Most Commonly Used Annotations in Spring Boot, including a closer look at the @Component, @Service, and @Repository stereotypes we used throughout this chapter.
Get the Source code
github.com/StackTipsLab/spring-boot-tutorials/tree/main/spring-dependency-injection